Need to capture what’s happening on your iPhone screen—whether it’s a gameplay clip, tutorial, app walkthrough, or a quick bug report? Apple has made this easy with a built-in screen recording feature. You can record video with or without sound, then save or share it directly from your Photos app.
This complete guide explains how to enable screen recording, customize settings, record with or without audio, and edit or share your videos—all without needing any third-party apps.
🎥 What Is Screen Recording on iPhone?
Screen recording captures real-time video of everything happening on your iPhone display. It records:
- App usage
- Games
- Website navigation
- Text input
- On-screen tutorials
You can also choose to record microphone audio, which is perfect for adding live voice commentary.
Available on all iPhones running iOS 11 or later.
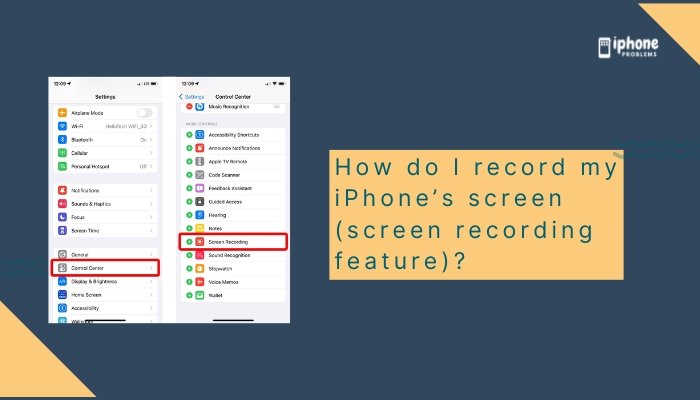
📲 How to Enable Screen Recording in Control Center
Before you can record, you must first add the Screen Recording control to the Control Center (if it’s not already there).
✅ Steps:
- Open the Settings app.
- Tap Control Center.
- Scroll down and tap the green + button next to Screen Recording.
- Exit settings.
Now you’ll see a recording icon (solid dot inside a circle) in your Control Center.
🟥 How to Start a Screen Recording
✅ Steps:
- Open the Control Center:
- Swipe down from the top-right corner (Face ID iPhones)
- Swipe up from the bottom edge (Home button iPhones)
- Tap the Screen Recording icon (white circle with a dot).
- You’ll see a 3-second countdown, then recording begins.
- Exit Control Center and use your phone as usual.
A red status bar or red recording indicator will appear at the top to show you’re recording.
🎙️ How to Record With Microphone Audio
Want to narrate your screen recording?
✅ Steps:
- Open Control Center.
- Press and hold the Screen Recording icon.
- Tap the Microphone icon to turn audio ON (it turns red).
- Tap Start Recording.
This records both screen content and your voice through the iPhone’s microphone.
⏹️ How to Stop a Screen Recording
✅ Method 1:
- Tap the red status bar (top of screen).
- Tap Stop in the pop-up confirmation.
✅ Method 2:
- Open Control Center.
- Tap the Screen Recording icon again.
A notification will confirm the video has been saved to your Photos app.
📁 Where Are Screen Recordings Saved?
All screen recordings are saved automatically to the Photos app.
To find them:
- Open Photos.
- Tap Albums > Screen Recordings (or search “Screen Recording”).
- Tap to view, edit, or share the video.
✂️ How to Edit a Screen Recording
Want to trim the start or end of your video?
✅ Steps:
- Open the video in Photos.
- Tap Edit in the top-right corner.
- Use the slider handles to trim the video.
- Tap Done, then choose Save Video as New Clip or overwrite the original.
You can also use third-party apps like iMovie, InShot, or CapCut for advanced edits.
🔐 Screen Recording Limitations
- DRM-protected content (like Netflix or Apple TV) will show a black screen during recording.
- Notifications that appear while recording will be captured—enable Do Not Disturb for clean videos.
- Some apps may block screen recording features for privacy reasons.
🧠 Pro Tips for Better Screen Recording
- Use Do Not Disturb to avoid interruptions:
Settings > Focus > Do Not Disturb > Turn On - Practice your sequence before starting to avoid mistakes.
- Landscape mode is best for gameplay or video tutorials.
- If recording with sound, speak clearly and avoid noisy environments.
- Trim your videos before sharing to keep them concise and focused.
📋 Summary Table
| Action | Steps |
| Enable screen recording | Settings > Control Center > Add Screen Recording |
| Start recording | Control Center > Tap record icon |
| Record with microphone | Press and hold record icon > Turn on Microphone |
| Stop recording | Tap red status bar or icon again |
| View recording | Photos app > Albums > Screen Recordings |
| Edit video | Photos > Select video > Edit > Trim |
| Avoid interruptions | Turn on Do Not Disturb before recording |
✅ Final Thoughts
The screen recording tool on iPhone is simple, powerful, and perfect for creating tutorials, troubleshooting, sharing gameplay, or documenting bugs. With just a few taps, you can record anything on your screen, add voice commentary, and share it instantly—all without downloading any extra apps.
Whether you’re a student, creator, professional, or casual user, this built-in feature makes capturing and sharing your iPhone experience easier than ever.
Meta Description:
Learn how to record your iPhone screen using the built-in screen recording feature.Step-by-step guide to enable, start, stop, edit, and share screen recordings with or without audio.