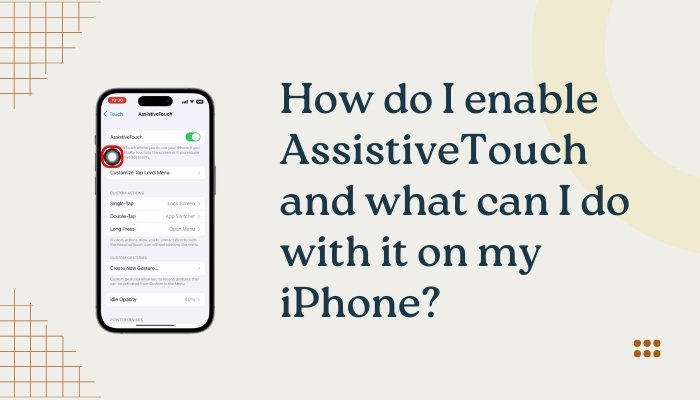
AssistiveTouch is one of the most helpful accessibility features on the iPhone. It provides an on-screen touch interface that allows you to perform physical gestures (like pressing the Side button, swiping, or pinching) using simple taps on a virtual menu. Whether you have trouble using physical buttons, are recovering from an injury, or just want easier access to controls, AssistiveTouch can dramatically improve your iPhone experience.
In this comprehensive guide, you’ll learn how to enable AssistiveTouch, customize it, and use it for everyday tasks—all without needing to press physical buttons.
✋ What Is AssistiveTouch?
AssistiveTouch creates a floating, movable virtual button on your screen. When you tap this button, a customizable menu appears with options like:
- Home button
- Volume controls
- Gestures (swipe, pinch, etc.)
- Siri access
- Control Center, Notification Center
- Screen capture, restart, multitasking, and more
This feature is especially useful for users who:
- Have physical or motor limitations
- Use their iPhone one-handed
- Have a broken physical button (e.g., Home or Side button)
✅ How to Enable AssistiveTouch
You can turn on AssistiveTouch in a few ways:
Method 1: From Accessibility Settings
- Open the Settings app.
- Go to Accessibility > Touch > AssistiveTouch.
- Toggle AssistiveTouch to ON.
A gray circular button will appear on your screen. This is the AssistiveTouch menu button.
Method 2: Using Siri
Simply say:
“Hey Siri, turn on AssistiveTouch.”
Siri will enable it immediately.
Method 3: Using the Accessibility Shortcut
You can set AssistiveTouch to toggle on/off with a triple-click of the Side or Home button.
- Go to Settings > Accessibility > Accessibility Shortcut.
- Select AssistiveTouch.
Now you can enable or disable it quickly without digging into menus.
📱 How to Use the AssistiveTouch Menu
Once AssistiveTouch is enabled, tap the floating button to open the menu. You’ll see several options, depending on your customization.
Default options include:
- Home – Simulates the Home button.
- Siri – Launches Siri.
- Device – Offers controls like volume, lock screen, rotate screen, mute, etc.
- Control Center – Access iOS Control Center.
- Notification Center – Open your notifications.
- Custom Gestures – Tap, swipe, or create multi-finger gestures.
You can move the button anywhere along the edge of the screen for easier access.
🧩 Customize the AssistiveTouch Menu
You can personalize the AssistiveTouch menu to suit your preferences.
Steps:
- Go to Settings > Accessibility > Touch > AssistiveTouch.
- Tap Customize Top Level Menu.
- Use the plus (+) or minus (–) buttons to add or remove functions (up to 8 icons).
- Tap any icon to replace it with another action.
Popular additions:
- Screenshot
- Restart
- App Switcher
- Lock Rotation
- Shake (helpful for undoing actions)
🎛️ Create Custom Gestures
If you frequently use pinch, zoom, or swipe actions, you can record your own gesture.
To create a custom gesture:
- Go to Settings > Accessibility > Touch > AssistiveTouch.
- Tap Create New Gesture.
- Perform the gesture on the screen.
- Tap Stop > Save, and name it.
Your new gesture will now appear in the AssistiveTouch menu.
🔁 Use AssistiveTouch for Physical Button Replacement
If your Home, Side, or Volume buttons are not functioning properly, AssistiveTouch can fully replicate them:
- Home: Tap the Home icon to go to the home screen.
- Siri: Tap Siri instead of long-pressing the Side button.
- Lock Screen: Tap Device > Lock Screen.
- Volume: Tap Device > Volume Up/Down.
This makes it a great temporary fix for broken hardware.
🖥️ Use AssistiveTouch with an External Mouse (iOS 13+)
AssistiveTouch also supports external pointing devices via Bluetooth or USB adapters.
To pair a mouse:
- Go to Settings > Accessibility > Touch > AssistiveTouch.
- Scroll down to Pointer Devices > Devices > Bluetooth Devices.
- Pair your mouse.
- Use the pointer to navigate, click, scroll, and more.
The floating AssistiveTouch menu will help you simulate taps, drags, and gestures.
🎮 Use AssistiveTouch for Gaming or Multitasking
- Assign custom gestures for gaming (e.g., rapid taps or swipes).
- Quickly switch apps, take screenshots, or return to the Home screen during gameplay.
- Improve one-handed use for apps that require multiple taps or gestures.
🧠 Pro Tips for Using AssistiveTouch
- Idle Opacity: Adjust how transparent the button is when not in use (Settings > Accessibility > Touch > AssistiveTouch > Idle Opacity).
- Long Press/Double-Tap Actions: Assign special functions to long pressing or double-tapping the AssistiveTouch button.
- Dock Position: Move the button to any edge of the screen for easy one-hand access.
📋 Summary Table
| Feature | Description |
| Enable AssistiveTouch | Settings > Accessibility > Touch > AssistiveTouch |
| Quick Access | Siri or triple-click Side/Home button |
| Customize Menu | Add/remove up to 8 functions |
| Create Gestures | Record and save custom screen gestures |
| Replace Physical Buttons | Access Home, Siri, Lock, Volume controls, etc. |
| Use with Mouse | Pair pointer devices for full screen control |
| Use in Games | Simulate taps, pinches, or complex actions |
✅ Final Thoughts
AssistiveTouch is more than an accessibility tool—it’s a powerful feature that enhances usability for everyone. Whether you’re managing a broken button, improving one-handed navigation, or need assistive features due to physical limitations, AssistiveTouch gives you full control over your iPhone without touching physical buttons.
Set it up in just a few taps and discover how much easier it is to interact with your device—hands-free and hassle-free.
Meta Description:
Learn how to enable and use AssistiveTouch on your iPhone. Step-by-step guide to access features, create custom gestures, and replace physical buttons for hands-free use.