Taking a screenshot on your iPhone is one of the easiest and most useful tools you can use. Whether you’re capturing a text conversation, saving a payment confirmation, or grabbing a still from a video or map, screenshots let you preserve and share exactly what’s on your screen in a few quick steps.
This detailed guide will show you how to take, edit, and share screenshots on every iPhone model, including devices with Face ID and those with a Home button. We’ll also cover how to find your screenshots, use AssistiveTouch to capture without physical buttons, and even how to capture full-page screenshots of websites.
✅ What Is a Screenshot?
A screenshot is a digital image of whatever is currently displayed on your iPhone’s screen. It’s like taking a photo of your screen at that moment. The screenshot is automatically saved to your Photos app and can be edited or shared instantly.
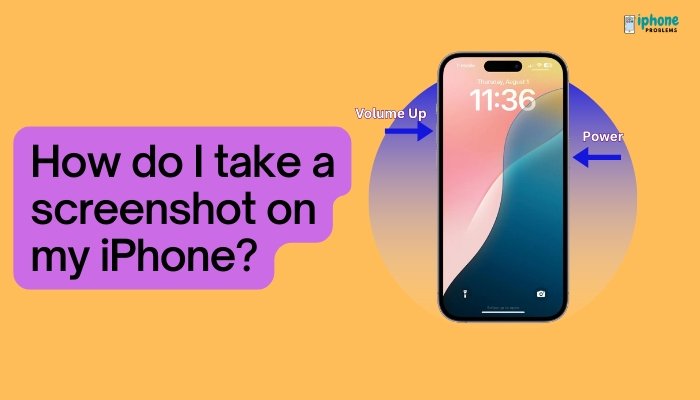
📲 How to Take a Screenshot on iPhones with Face ID (No Home Button)
This includes:
- iPhone X
- iPhone 11, 12, 13, 14, and 15 series
Steps:
- Hold your iPhone in your hand.
- Press the Side button (on the right side) and the Volume Up button (on the left side) at the same time.
- Quickly release both buttons.
You’ll see a flash of the screen, and a thumbnail of the screenshot will appear in the bottom-left corner.
💡 If you press and hold too long, you might trigger the power-off or SOS screen, so just tap and release quickly.
📱 How to Take a Screenshot on iPhones with a Home Button
This includes:
- iPhone SE (2nd/3rd Gen)
- iPhone 6, 6s, 7, 8, and earlier models
Steps:
- Press the Side (or Top) button and the Home button at the same time.
- Quickly release both buttons.
The screen will flash and the screenshot thumbnail will appear in the corner.
This method works as long as both buttons are functioning normally.
🛠️ How to Take a Screenshot Using AssistiveTouch (No Buttons Needed)
If your hardware buttons aren’t working or you’re using your iPhone hands-free, use AssistiveTouch:
Enable AssistiveTouch:
- Go to Settings > Accessibility > Touch > AssistiveTouch.
- Toggle AssistiveTouch ON.
- A floating button will appear on your screen.
To Take a Screenshot:
- Tap the AssistiveTouch button.
- Tap Device > More > Screenshot.
Your iPhone will capture the screen just like using the buttons.
📌 Great for users with physical limitations or a broken button.
🖋️ How to Edit a Screenshot Immediately After Taking It
When the screenshot thumbnail appears in the bottom-left:
- Tap it before it disappears.
- Use the built-in Markup tools to:
- Draw or highlight
- Add text, shapes, or your signature
- Crop or zoom
- Tap Done to:
- Save to Photos
- Save to Files
- Or Delete if not needed
If you don’t tap it, the screenshot will auto-save to your Photos app.
🌐 How to Take a Full-Page Screenshot (Safari Only)
If you’re in Safari and want to capture an entire webpage:
- Take a normal screenshot.
- Tap the screenshot thumbnail.
- At the top, tap Full Page.
- Use the slider to preview the entire page.
- Tap Done, then choose Save PDF to Files.
This saves the full webpage as a scrollable PDF, not an image.
🖼️ Where to Find Your Screenshots
All screenshots are saved automatically in the Photos app:
- Open Photos > Albums > Screenshots
- Or simply open Photos > Recents (they appear in order)
You can also search for “screenshot” using the Search tab in Photos.
🔄 How to Share a Screenshot
- Open the screenshot in the Photos app.
- Tap the Share icon (square with an up arrow).
- Choose how to send:
- Messages
- AirDrop
- Save to Files
- Print, etc.
You can even annotate it before sending.
🧼 How to Delete Screenshots
- Go to Photos > Screenshots album.
- Tap Select in the top right.
- Tap one or more screenshots.
- Tap the trash icon to delete.
Deleted screenshots go to Recently Deleted and stay there for 30 days unless permanently removed.
📌 Summary of Screenshot Methods
| iPhone Model | Screenshot Shortcut |
| Face ID (No Home Button) | Side Button + Volume Up |
| Home Button Models | Side/Top Button + Home Button |
| AssistiveTouch | Device > More > Screenshot |
| Safari (Full Page) | Tap Full Page in Markup after screenshot |
✅ When to Use Screenshots
- Save receipts or booking confirmations
- Capture error messages or bugs
- Keep a record of text messages or social posts
- Share screen content in tutorials or instructions
- Save visual ideas or references quickly
📣 Final Tips
- Be quick! Screenshot thumbnails disappear in about 5 seconds.
- Don’t hold buttons too long or you may activate Emergency SOS.
- Use Do Not Disturb if you don’t want notifications in your screenshots.
- Use Back Tap (Settings > Accessibility > Touch > Back Tap) to assign screenshots to a double-tap or triple-tap on the back of your iPhone.
Meta Description:
Learn how to take screenshots on any iPhone model using buttons, AssistiveTouch, or full-page capture in Safari. Step-by-step guide with editing, sharing, and troubleshooting tips.