The Magnifier on your iPhone turns your device into a powerful digital magnifying glass. Whether you’re trying to read fine print, inspect small objects, or enhance visibility in low-light conditions, the Magnifier app offers zoom, contrast, flashlight, and filter options to make details clearer.
In this step-by-step guide, you’ll learn how to turn on and access the Magnifier, use its key features, customize its settings, and get tips for making the most out of this built-in accessibility tool.
🔍 What Is the Magnifier on iPhone?
The Magnifier is an accessibility feature that uses your iPhone’s camera to let you zoom in on physical objects or text. It’s ideal for:
- Reading small print on medicine labels, menus, or contracts
- Examining product serial numbers or model labels
- Zooming in on electronics, fine jewelry, or maps
- Helping people with low vision see better
It works like a live camera with enhanced magnification, filters, brightness adjustments, and even image freezing.
✅ How to Enable the Magnifier App
The Magnifier is included by default on most iPhones running iOS 14 or later, but you may need to manually enable or access it for quick use.
Method 1: Enable via Accessibility Settings
- Open the Settings app.
- Tap Accessibility.
- Scroll down and tap Magnifier.
- Toggle Magnifier to ON.
This adds the Magnifier as an app on your Home Screen or App Library.
Method 2: Add Magnifier to Control Center
For quicker access, add it to your Control Center.
- Go to Settings > Control Center.
- Scroll to Magnifier and tap the + icon to add it.
- Now, swipe down from the top-right corner (on Face ID iPhones) or swipe up (on Touch ID iPhones) to open Control Center and tap the Magnifier icon.
Method 3: Use the Side Button Shortcut (Accessibility Shortcut)
If you want to launch it even faster:
- Go to Settings > Accessibility > Accessibility Shortcut.
- Select Magnifier.
- Now, triple-click the side button (or Home button on older models) to launch Magnifier instantly.
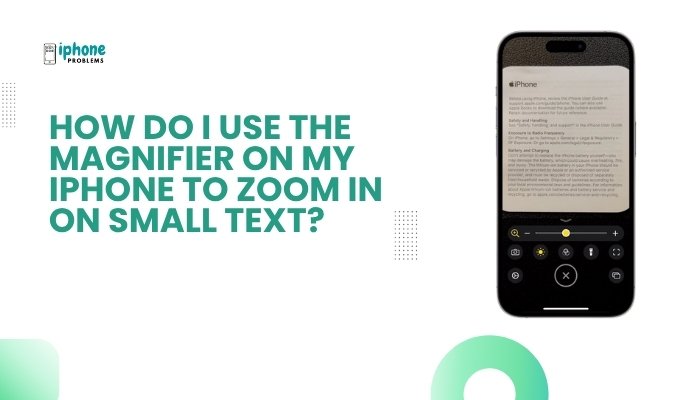
🔬 How to Use the Magnifier App
Once the app opens, you’ll see a live camera view with several tools.
Main Features:
- Zoom Slider: Use the slider to zoom in and out (up to 15x depending on your iPhone).
- Shutter Button: Freeze the current view (great for reading without shaking).
- Filters: Change color modes (e.g., grayscale, inverted, yellow/blue) to enhance contrast.
- Brightness & Contrast: Adjust lighting conditions directly within the app.
- Flashlight: Use the flashlight to illuminate dark areas.
- Auto Focus Lock: Tap the screen once to lock focus on a certain object or text.
Step-by-Step: Zoom in on Small Text
- Open the Magnifier via app, Control Center, or side button.
- Point the camera at the small text (e.g., label or receipt).
- Use the slider at the bottom to zoom in.
- Tap the flashlight icon if it’s too dark.
- Tap the shutter button (big white circle) to freeze the image.
- Once frozen, drag or pinch to move and zoom further.
- Use filters if contrast or color makes it easier to read.
- Tap the shutter button again to return to live mode.
📸 Saving or Sharing Images
By default, Magnifier does not save captured images like the Camera app. It freezes them temporarily. However:
- You can screenshot the frozen image by pressing Side + Volume Up (Face ID iPhones) or Home + Side Button (Touch ID models).
- Screenshots are saved to your Photos app, where you can edit or share them.
🧩 Customizing the Magnifier Interface
Tap the gear icon (on iOS 15+) in the Magnifier to customize tools:
- Add or remove controls (Zoom, Brightness, Filters, Flashlight, etc.)
- Rearrange tool layout for easy access
- Set multi-shot mode to capture several images for comparison
This is helpful if you frequently use Magnifier for certain tasks and want fewer buttons on-screen.
👓 Magnifier Tips for Low Vision Users
- Combine Magnifier with VoiceOver (Settings > Accessibility > VoiceOver) to have text read aloud.
- Use Display Filters to reduce visual strain (e.g., increase contrast, invert colors).
- Magnifier can be used with external magnifying lenses or stands for added hands-free stability.
📋 Summary Table
| Feature | Action |
| Launch Magnifier | Settings > Accessibility > Magnifier, or use Control Center/Side Button |
| Zoom in/out | Drag slider on screen |
| Freeze frame | Tap the white shutter button |
| Add light | Tap the flashlight icon |
| Adjust contrast | Tap filters and modify brightness/contrast settings |
| Save image | Take a screenshot manually |
| Accessibility shortcut | Triple-press Side or Home button |
| VoiceOver compatibility | Read small text aloud with accessibility integration |
✅ Final Thoughts
The Magnifier app on iPhone is an incredibly useful tool for both everyday tasks and accessibility needs. Whether you’re reading fine print, examining a circuit board, or trying to see in low light, your iPhone’s camera becomes a real-time zoom lens with powerful enhancements. It’s fast, easy to use, and already built into your device—so there’s no need for extra gadgets or magnifying glasses.
Set up access shortcuts today and make sure you always have a powerful digital magnifier at your fingertips.
Meta Description:
Learn how to use the Magnifier on your iPhone to zoom in on small text. Step-by-step guide to enable, use, customize, and capture images using the iPhone Magnifier app.